Visual branding
 Visual branding refers to the use of visual elements, such as logos, colors, typography, and graphics, to create a consistent and recognizable identity for a brand. It is an important aspect of brand identity, as it helps convey the brand’s personality, values, and messages to its target audience.
Visual branding involves creating a visual system that is unique, memorable, and reflective of the brand’s overall positioning and image. This visual system is typically used across various marketing and communication materials, including websites, social media, packaging, signage, advertising, and more.
Some key components of visual branding include:
- Logo: A logo is a visual symbol or mark that represents a brand. It is often the most recognizable element of a brand’s visual identity and is used to create brand recognition and recall.
- Colors: Colors play a significant role in visual branding, as they evoke emotions and convey meanings. Brands typically have a set of colors that are associated with their identity and consistently used across their visual materials.
- Typography: The choice of fonts and typography can convey a brand’s personality, tone, and style. Consistent typography helps create visual cohesion and brand recognition.
- Graphics and imagery: Graphics, illustrations, and imagery used in a brand’s visual branding can help reinforce the brand’s messaging, personality, and values. They can be used to create visual interest and evoke emotions.
- Design elements: Design elements, such as patterns, shapes, and textures, can be used to create a distinctive visual style that is unique to a brand.
Consistency is key in visual branding style guides to ensure that the brand is easily recognizable and memorable to its target audience. When done well, visual branding can create a strong and cohesive brand identity that helps differentiate a brand from its competitors and builds brand recognition and loyalty among consumers.
Do and don’ts logo usage
 Using logos correctly is important to maintain brand integrity and ensure that the logo is used in a consistent and professional manner. Here are some do’s and don’ts for logo usage:
Do’s:
- Use the logo in its original form: Use the logo as it is provided by the brand owner without making any modifications or alterations to its design, colors, proportions, or orientation.
- Maintain clear space: Keep a clear space around the logo to ensure it stands out and is not cluttered by other elements. Follow the brand owner’s guidelines for the minimum clear space required.
- Use the logo in appropriate colors: Use the logo in the brand owner’s approved color palette, as specified in their guidelines. Do not modify the colors of the logo or use it in colors that are not approved.
- Use high-resolution logos: Always use high-resolution versions of the logo to ensure that it appears crisp and clear in all applications, including print and digital media.
- Follow brand guidelines: Follow the brand owner’s guidelines for logo usage, which may include specifications for size, placement, and other usage instructions. This helps ensure consistency and uniformity in the logo’s appearance across various media.
Don’ts:
- Alter the logo: Do not modify, stretch, skew, or distort the logo in any way. This includes changing its design elements, colors, or proportions. Using the logo in a way that deviates from the original design may dilute the brand’s identity.
- Use outdated or unauthorized versions: Do not use outdated or unauthorized versions of the logo. Always use the most current and approved version of the logo, as provided by the brand owner.
- Use the logo in inappropriate contexts: Do not use the logo in a manner that is inappropriate, offensive, or misleading. Avoid placing the logo on backgrounds or in contexts that could compromise the integrity of the brand or its image.
- Overcrowd the logo: Do not overcrowd the logo with other visual elements or text. Keep a clear space around the logo to ensure it has visual impact and is easily recognizable.
- Use the logo for unauthorized purposes: Do not use the logo for purposes that are not authorized by the brand owner. This includes using the logo for personal or commercial purposes without proper permission, or using the logo in a way that could imply an endorsement or partnership without proper authorization.
Remember, it’s important to always follow the brand owner’s guidelines for logo usage to maintain the integrity and consistency of the brand’s visual identity. If in doubt, seek permission from the brand owner before using the logo in any way that may deviate from their guidelines.
Do and don’ts in brand guidelines
 Brand styles guide are essential documents that outline how a brand should be consistently represented across various touchpoints. Here are some do’s and don’ts to keep in mind when creating brand guidelines:
Do’s:
- Define the brand’s core elements: Clearly define the brand’s core elements, including the logo, colors, typography, imagery, and tone of voice. Provide guidelines on how these elements should be used consistently across all brand communications.
- Establish usage rules: Specify clear usage rules for the brand elements, including size, placement, spacing, and minimum reproduction sizes. This ensures that the brand is represented consistently and maintains its integrity across different mediums.
- Provide examples: Include visual examples of correct and incorrect usage of brand elements to help stakeholders understand how to use them properly. This can include mockups, diagrams, or real-world examples of brand applications.
- Include brand messaging: Outline the brand’s key messaging and tone of voice, including brand values, positioning, and key messages. This helps maintain consistency in brand communication, voice, and messaging across different platforms.
- Address digital and social media: Provide guidelines for using the brand elements in digital and social media contexts, including avatar and profile picture usage, social media post layouts, and digital brand assets. This ensures consistency across all online platforms.
Don’ts:
- Leave room for interpretation: Avoid ambiguity or vagueness in your brand guidelines. Be clear and concise in your instructions to ensure that brand elements are used consistently without room for misinterpretation.
- Neglect legal considerations: Don’t overlook legal considerations, such as trademark usage, copyright, and usage rights. Make sure to include legal guidelines and restrictions to protect the brand from potential legal issues.
- Allow unauthorized modifications: Specify that brand elements should not be modified, altered, or distorted in any way without proper authorization. This ensures that the brand is represented consistently and maintains its integrity.
- Ignore consistency: Avoid inconsistencies in brand elements, such as using different color variations, typography, or logo sizes across different applications. Consistency is key to building a strong and recognizable brand identity.
- Overlook flexibility: While it’s important to maintain consistency, brand guidelines should also allow for flexibility and adaptability. Don’t create guidelines that are too rigid and restrict creativity, as it may limit the brand’s ability to evolve and adapt to changing trends or contexts.
Remember, brand guidelines are meant to be a comprehensive reference for stakeholders to maintain brand consistency. Following these do’s and don’ts will help ensure that your brand is represented consistently and effectively across all touchpoints, helping to build a strong and recognizable brand identity.
How do I add a style sheet to a web page?
 Adding style guidelines sheet to a web page involves a few simple steps. Here’s a basic overview of the process:
- Create a CSS file: First, create a new text file with a .css extension. You can do this using a code editor, such as Notepad++, Sublime Text, or Visual Studio Code. Save the file with a descriptive name, such as “style.css”, to a location on your computer where you can easily access it.
- Link the CSS file in the HTML document: In the HTML document that you want to apply the styles to, you’ll need to add a link to the CSS file. You can do this by adding a <link> element in the <head> section of your HTML document, like this:
<html>
<head>
<title>My Web Page</title>
<link rel="stylesheet" href="style.css">
</head>
<body>
<!-- Your HTML content goes here -->
</body>
</html>
In the example above, the “href” attribute in the <link> element specifies the path to the CSS file, “style.css”. Make sure to provide the correct file path, including the file name and extension, in the “href” attribute.
- Write CSS rules: Open your CSS file, “style.css”, in your code editor, and start writing CSS rules to define the styles you want to apply to your web page. For example:
body {

font-family: Arial, sans-serif;

background-color: #f0f0f0;

}
h1 {color: blue;
text-decoration: underline;
}
In the example above, the CSS rules define styles for the <body> and <h1> elements, such as font family, background color, text color, and text decoration.
- Save and refresh: Once you’ve written your CSS rules, save the CSS file. Then, refresh your web page in your web browser to see the styles applied. If everything is set up correctly, you should see the styles from your CSS file affecting the HTML elements on your web page.
That’s it! You’ve successfully added a style sheet to your web page using CSS. You can continue to edit your CSS file to customize the styles of your web page further.
How do I make a css template?
 Creating a CSS (Cascading Style Sheets) template involves several steps, which include:
- Decide on the purpose and layout of your template: Determine what type of website or web page you want to create and what elements you want to include, such as headers, navigation menus, content sections, and footers. Plan out the overall layout and structure of your template.
- Create an HTML file: Start by creating a basic HTML file that serves as the structure of your template. Define the HTML elements such as
<!DOCTYPE html>,<html>,<head>, and<body>. Include placeholders for the content that will be dynamically added to the template. - Add CSS styles: Create a separate CSS file or add inline CSS within your HTML file to define the styles for your template. Use CSS selectors to target the HTML elements you want to style, and apply CSS properties such as color, font-size, margin, padding, and more to customize the appearance of your template. You can also use CSS frameworks or libraries to expedite the styling process.
- Define reusable classes and IDs: Create reusable CSS classes and IDs that can be applied to different elements in your template to maintain consistency across your website. For example, you could define a
.headerclass for styling header elements and an#navbarID for styling the navigation menu. - Add media queries for responsiveness: If you want your template to be responsive and adapt to different screen sizes, use media queries to define different styles for different devices or screen widths. This will ensure that your template looks good on various devices, including desktops, tablets, and smartphones.
- Test and refine your template: Preview your template in different web browsers to ensure that it renders correctly and looks good on different devices. Make any necessary adjustments to your CSS styles and HTML structure to fine-tune your template.
- Document your template: Document the structure, styles, and usage of your template so that others can easily understand and use it.
Once your CSS template is complete, you can use it as a starting point for building multiple web pages with consistent styling by linking to the CSS file in your HTML files or by copying and pasting the CSS styles directly into your HTML files.
How do I create a style guide for an app?
 Creating a style guide for an app involves establishing a set of guidelines that define the visual and interactive elements of the app’s user interface. A style guide helps ensure consistency and coherence in the app’s design across different screens and interactions, which in turn enhances the user experience. Here are the steps to create a style guide for an app:
- Define the App’s Branding: Start by identifying the app’s branding elements, such as the logo, color palette, typography, and imagery. These elements should align with the overall branding of your app or company, if applicable. Specify the exact colors, fonts, and logo usage rules in your style guide.
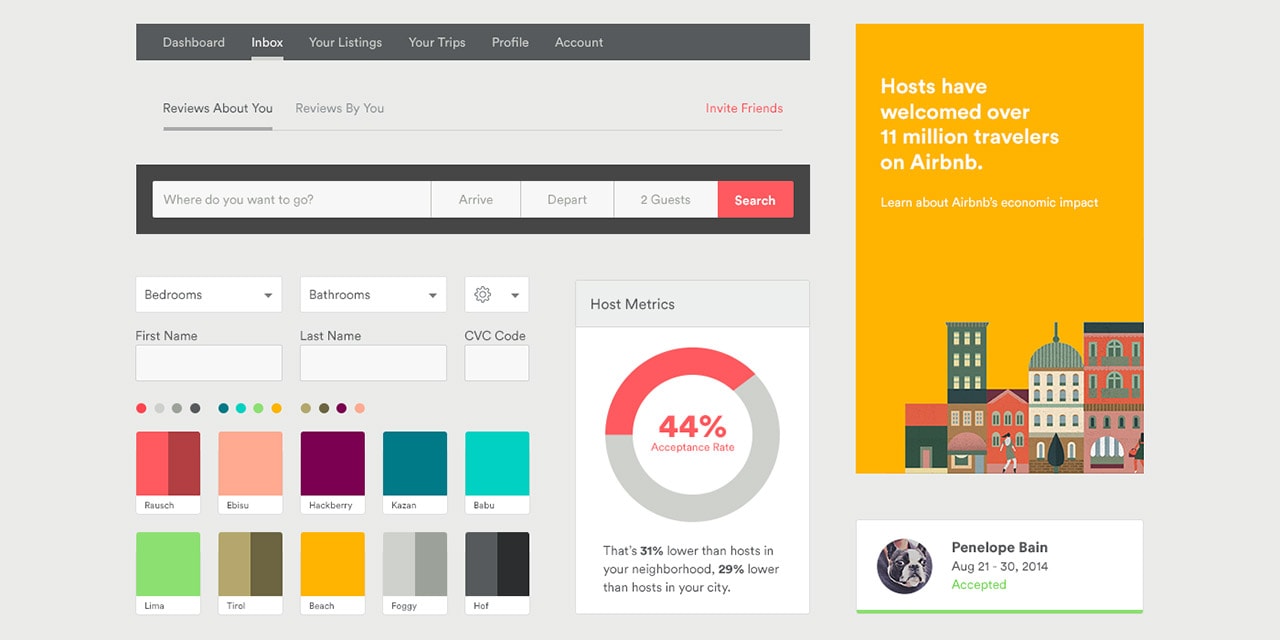
- Establish UI Components: Create a list of common UI components used in your app, such as buttons, text fields, checkboxes, and icons. Define their appearance, behavior, and interactions in the style guide. Include details such as color, size, spacing, and alignment. Use visual examples to illustrate the intended usage of each component.
- Define Navigation and Layout: Specify the navigation patterns and layout guidelines for your app. This includes how screens or views are organized, how the user interacts with different sections of the app, and how information is laid out on the screen. Define rules for grids, margins, paddings, and responsive design, if applicable.
- Provide Visual Examples: Include visual examples of how the app’s interface should look and behave. Use screenshots, mockups, or interactive prototypes to illustrate the intended visual design, animations, and transitions. Include both desktop and mobile views, if applicable.
- Document Interaction Patterns: Define the interaction patterns and gestures used in the app, such as swiping, tapping, pinching, or dragging. Explain how these interactions should be used consistently throughout the app to ensure a seamless user experience.
- Document Content Guidelines: Specify guidelines for content creation, including tone of voice, language, and writing style. This is especially important for apps that involve user-generated content or include text-based interactions. Define guidelines for text formatting, typography, and content hierarchy.
- Update and Maintain: Keep the style guide up-to-date as the app evolves over time. As new features are added or design changes are made, update the style guide accordingly to ensure consistency in the app’s design.
Well-designed brand guidelines for your app can serve as a valuable reference for designers, developers, and other stakeholders involved in the app’s development. It helps ensure consistency and coherence in the app’s visual design, interactions, and content, resulting in a better user experience for your app’s users.
Frequently Asked Questions
How important is Style sheet graphic design for branding? Style sheet graphic design is paramount for branding as it establishes visual consistency, aiding in brand recognition and building a strong identity.
Can I use multiple fonts in Style sheet graphic design? While it’s possible, it’s crucial to maintain coherence. Limiting fonts ensures readability and a unified visual identity.
What software is best for Style sheet graphic design? Leading software like Adobe Creative Suite and Sketch are popular choices, offering a wide array of tools for effective Style sheet graphic design.
Is responsive design essential in Style sheet graphic design? Absolutely. With the diverse range of devices, responsive design ensures your creations look impeccable across all platforms.
How does Style sheet graphic design contribute to user experience? Style sheet graphic design enhances user experience by creating visually appealing, easy-to-navigate designs that leave a positive impression.
Can Style sheet graphic design be learned without formal education? Yes, many successful designers are self-taught. Online resources, tutorials, and practice can help develop Style sheet graphic design skills.
Conclusion
In the realm of graphic design, mastering Style sheet graphic design is your key to unlocking limitless creativity. Elevate your designs, establish a strong brand identity, and leave a lasting impact on your audience. Dive into the world of Style sheet graphic design and transform your creative journey.