
In today’s digital world every real estate knows that clear and high-quality images not only attract the customers but also influence them to connect with you to take a look at the property and purchase them to become your customers.
Real estate retoucher
What is real estate image? This has significantly increased the demand for real estate photography retouching services as high-quality output can be achieved by outsourcing your work to the professionals in the market which will help you convert your leads into customers.
So, if you are running a professional real estate retoucher business and want to attract more target audiences and increase your customer base you can definitely outsource your real estate photo retouching services to us.
-
ACHIEVE REAL ESTATE RETOUCHER COMPETITIVE EDGE
With the advancement in the real estate sector, we can see many people entering the industry which has raised the competition bar and the number of competitors in the market.
By taking the help of our real estate retoucher experts, real estate business owners and agents can get a competitive edge by getting the images edited in the most professional way. You can get high-quality real estate images in less time which can easily attract and engage your target audience.
-
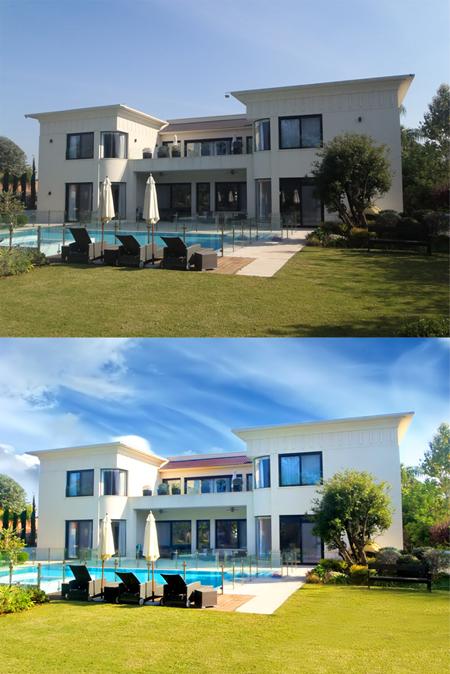
DAY TO DUSK SERVICES FOR REAL ESTATE RETOUCHER IMAGES
We have a professional team of experienced real estate day to dusk image editors that provide day to night conversion services to our clients so that they can get the desired view for their images.
Our experts hold expertise in adding favorable weather conditions, altering artificial lighting, adjusting and altering poor colors balance and color casts along with others.
-
DIGITAL DECLUTTERING SERVICES FOR REAL ESTATE IMAGES
We have a dedicated team of professional real estate photo editors on board that is specifically trained to perform advanced operations using the latest and innovative tools and clear all the clutter that your real estate images possess.
We assure you that by opting for our digital decluttering services for your real estate images you will get professional and high-quality images in return. -
PANORAMA STITCHING SERVICES FOR REAL ESTATE IMAGES
The reason that we are a leading real estate photo editing services company is that we have dedicated experts on board that use the latest and innovative stitching software and technologies and deliver high-quality and professional real estate panoramic images.
-
HDR BLENDING SERVICES FOR REAL ESTATE IMAGES
Outsource your property images blending services to us and get attractive and engaging property views as output. We are experts in blending images and can therefore blend images that are shot in different exposure or spotlight to create pictures that are visually aesthetic and of high quality.
The best thing is that we use the HDR image blending technique. This is to blend the images that are taken in different exposures. They also have different shades of contrast and brightness. The expertise and the ability to use the latest tools and techniques help us in producing high-quality images that can actually satisfy our customers.
-
VIRTUAL STAGING SERVICES FOR REAL ESTATE IMAGES
- The results that you will achieve by outsourcing your work to us will be as per your expectations as our experts work in close coordination with our clients to produce satisfactory results.The reason that we are able to provide premium virtual staging services to our clients is the in-house team of real estate photography editor that have years of expertise in serving global clients and produce superior results with industry-best turnaround time.
 Connect for professional photo editing
We are a real estate photo editing services company that has experience and expertise in offering high-end photo editing services online to our customers that are based around the globe. We are serving the market and have been providing real estate photo editing services for more years.
With our expertise and the support of the in-house team of image editing experts on board, we have managed to achieve a customer retention rate of more than 90%. You can outsource real estate image editing services to us and just wait to receive the best-edited images that can serve the purpose for which they were clicked.
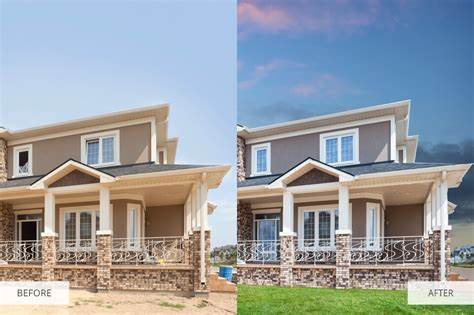
Hdr real estate image retouching
Hdr photo (High Dynamic Range) real estate image retouching is a process of enhancing and improving the appearance of real estate photographs using hdr editing techniques. HDR imaging involves capturing multiple exposures of the same scene and merging them to create a final image with a greater dynamic range.
To retouch HDR real estate images, you can follow these steps:
- Image selection: Choose the best images from the set of exposures captured. Look for well-exposed images that showcase the property’s features and have a good composition.
- Merge exposures: Use HDR software or image editing tools that support HDR merging to combine the selected images into a single HDR photograph. This process allows you to capture a wider range of details in both the highlights and shadows.
- White balance and color correction: Adjust the white balance to ensure accurate color representation. Correct any color casts or inconsistencies in the image. Real estate images should have natural-looking colors.
- Exposure adjustment: Fine-tune the exposure levels to ensure a balanced look throughout the image. Brighten up shadows and recover details in the highlights without overdoing it.
- Contrast and clarity: Enhance the image’s overall contrast to make it more visually appealing. Use local adjustments or global contrast adjustments to bring out the details in different areas of the photo. Apply clarity adjustments to improve the image’s sharpness and definition.
- Lens correction: Correct any distortions or perspective issues caused by the camera lens. Straighten vertical lines and remove barrel or pincushion distortions. This step helps in presenting the property accurately.
- Object removal: Remove any unwanted objects or distractions that may detract from the property’s appearance. This could include dust, clutter, or even minor imperfections. Use tools like clone stamp or content-aware fill to seamlessly remove these objects.
- Sky enhancement: If the sky appears dull or washed out, replace it with a more vibrant and appealing sky. This can be done by using a sky replacement tool or manually blending a new sky into the image.
- Image sharpening: Apply selective sharpening techniques to enhance the image’s details. Avoid excessive sharpening, as it can introduce artifacts or noise.
- Final adjustments: Make any necessary final adjustments, such as cropping, straightening, or resizing the image. Ensure that the image is optimized for both web and print use.
Remember to maintain a balance between realism and aesthetics when retouching real estate images. The goal is to showcase the property accurately while making it visually appealing to potential buyers or viewers.
Elements photo editing
Picturing editing involves various elements that can be used to enhance or modify images. Here are some common elements used in photo editing:
- Cropping: Cropping involves removing unwanted parts of an image to improve composition or focus on a specific subject. It helps in removing distractions and creating a more visually appealing composition.
- Exposure adjustment: Exposure refers to the brightness or darkness of an image. Photo enhancement software allows you to adjust exposure to correct underexposed (dark) or overexposed (bright) images. This helps in achieving the desired lighting and tonal balance.
- Color correction: Color correction involves adjusting the overall color balance of an image. This can include altering the temperature (warmer or cooler), tint, saturation, and vibrancy. It helps in creating a consistent and pleasing color palette.
- Contrast and tone adjustments: Contrast determines the difference between the darkest and lightest areas of an image, while tone adjustments affect the overall brightness and darkness. Manipulating contrast and tones can help improve the overall depth, detail, and visual impact of the image.
- Sharpening and noise reduction: Sharpening enhances the clarity and details in an image, while noise reduction reduces unwanted digital noise or graininess. These adjustments can improve the overall sharpness and quality of the image.
- Retouching: Retouching involves removing blemishes, wrinkles, or other imperfections from a photo. It can also include techniques like skin smoothing, teeth whitening, and red-eye removal. Retouching helps in enhancing the appearance of the subject.
- Filters and effects: Many photo editing applications offer filters and effects that can be applied to an image. These can include black and white conversion, vintage or retro effects, artistic filters, and more. Filters and effects can add a creative touch or evoke a specific mood.
- Resizing and cropping: Resizing involves changing the dimensions of an image, either to make it smaller for web use or larger for printing. Cropping and resizing can go hand in hand to achieve the desired composition and size.
These are just a few elements of photo editing, and the possibilities are extensive, depending on the software or tools you use. Remember, photo editing is subjective, and the choices you make will depend on your creative vision and desired outcome.
Photo editing techniques
Photo editing is a versatile process that allows you to enhance and manipulate images using various techniques. Here are some commonly used photo editing techniques:
- Cropping: Cropping helps you remove unwanted elements or adjust the composition of an image by selecting a specific area and discarding the rest.
- Adjusting brightness, contrast, and exposure: These adjustments help you control the overall lighting and tonal balance of an image. Increasing brightness can make an image look more vibrant, while adjusting contrast enhances the difference between light and dark areas. Exposure adjustments affect the overall lightness or darkness of the image.
- Color correction: Color correction techniques allow you to adjust the colors of an image to make them more accurate or achieve a desired mood. You can modify individual color channels, such as red, green, and blue, or adjust overall color balance.
- Sharpening and noise reduction: Sharpening techniques enhance the clarity and details of an image, while noise reduction helps reduce unwanted digital noise or graininess that can occur in low-light or high-ISO photos.
- Retouching: Retouching involves removing blemishes, wrinkles, or other imperfections from a photo. It can also include techniques like teeth whitening, smoothing skin, or enhancing features.
- Adding filters and effects: Filters and effects can dramatically alter the mood or style of an image. They can include vintage, black and white, sepia, or other creative filters. Effects like vignettes, blurs, or selective focus can also be applied to draw attention to specific areas.
- Removing objects: Object removal techniques allow you to erase unwanted elements from an image. This can involve using cloning or healing tools to replace the removed area with nearby pixels.
- Image resizing and scaling: Changing the size or resolution of an image is often necessary for different purposes, such as printing, web display, or social media. Resizing and scaling techniques help maintain image quality while adjusting its dimensions.
- Adding text and graphics: Photo editing software allows you to overlay text, logos, watermarks, or other graphics onto an image. This can be useful for creating promotional materials, social media posts, or personalized designs.
- HDR (High Dynamic Range): HDR techniques combine multiple exposures of the same scene to create a final image with a broader range of tones, capturing more details in both shadows and highlights.
These are just a few examples of the many techniques available in photo editing. The specific tools and features may vary depending on the software you’re using, but these fundamental techniques are widely applicable across various applications.
How do you edit real estate photos?
Editing real estate photos typically involves several steps to enhance the overall appearance and appeal of the property. Here’s a general overview of the process:
- Select the right software: You can use professional photo editing software like Adobe Photoshop or Adobe Lightroom. Both offer a wide range of tools and features specifically designed for photo editing.
- Import and organize the photos: Transfer the real estate photos from your camera or device to your computer. Create a folder to keep them organized and easily accessible.
- Culling and selection: Review all the photos and select the best ones that showcase the property effectively. Delete any duplicate or irrelevant images to save time during the editing process.
- Adjust brightness, contrast, and exposure: Start by adjusting the overall brightness and exposure levels of the photo. This step involves modifying the highlights, shadows, and mid-tones to ensure a balanced and visually pleasing image.
- Color correction: Correct the colors to make them accurate and vibrant. Adjust the white balance to remove any unwanted color casts. Enhance the saturation and vibrancy, but be cautious not to overdo it, as the goal is to represent the property realistically.
- Straighten and crop: Align the photo properly by straightening any skewed angles or horizontal/vertical lines. Crop the image if necessary to remove any distracting elements and create a better composition.
- Remove distractions: Remove any unwanted objects or distractions that may draw attention away from the property. This can include power lines, cars, garbage bins, or anything that takes away from the overall aesthetic appeal.
- Sharpen and enhance details: Apply selective sharpening techniques to enhance the details in the photo. Be careful not to oversharpen, as it can create artifacts. Adjust the clarity or texture settings to bring out more details in specific areas.
- Image retouching: Perform basic retouching to eliminate minor imperfections like sensor dust, blemishes, or lens flares. However, avoid excessive retouching that could mislead potential buyers.
- Virtual staging (optional): If the property is vacant or lacks furniture, you can consider virtual staging. This involves adding furniture and decor digitally to give the impression of a fully furnished space.
- Save and export: Once you are satisfied with the edits, save the edited photo in a high-quality format like JPEG or TIFF. You may also want to save a copy of the original photo for backup purposes.
Remember, while editing can improve the visual appeal of real estate photos, it’s essential to maintain accuracy and represent the property truthfully.
What is flambient photography?
Flambient photography is a term that combines two techniques: flash photography and ambient (natural) lighting. It is primarily used in real estate and architectural photography to capture interior spaces in a visually appealing manner.
The goal of flambient photography is to balance the brightness of both the artificial flash lighting and the existing ambient light in a room. By blending these two lighting sources effectively, photographers can create images that showcase the room’s details, colors, and textures while maintaining a natural and realistic appearance.
Here’s a breakdown of the process involved in flambient photography:
- Capture ambient light: The photographer starts by taking a series of exposures with a longer shutter speed to capture the existing ambient light in the room. This allows the natural lighting to illuminate the scene.
- Introduce artificial flash: Next, the photographer introduces artificial flash lighting to brighten up specific areas of the room that may appear dark or underexposed in the ambient light exposures. Flashes or strobes are strategically positioned to provide additional light and fill in the shadows.
- Bracketed exposures: The photographer then takes a series of bracketed exposures, which consist of multiple images with varying exposure settings. This includes one or more ambient light exposures and one or more flash exposures.
- Post-processing: In post-processing, the photographer combines the bracketed exposures using specialized software to blend the ambient light and flash exposures together. This process ensures that the final image retains the details and colors from the ambient light while having well-lit areas due to the artificial flash.
The resulting flambient photograph showcases the best aspects of both the ambient and flash lighting, resulting in a well-balanced and visually appealing image of the interior space.
Flambient photography has gained popularity in real estate and architectural photography because it allows photographers to capture the full dynamic range of a room, enhancing its appeal and creating a professional look for marketing materials and property listings.
How do you photoshop real estate images?
To photoshop real estate images, you can follow these general steps:
- Prepare your workspace: Open Adobe Photoshop or any other image editing software that you prefer. Make sure you have the original image you want to work on.
- Duplicate the background layer: Create a duplicate layer of the original image by right-clicking on the background layer and selecting “Duplicate Layer.” This allows you to work on a separate layer while keeping the original intact.
- Adjust brightness, contrast, and levels: Use adjustment tools like “Brightness/Contrast,” “Levels,” or “Curves” to enhance the overall exposure and tonal range of the image. This helps to improve the lighting and make the photo more appealing.
- Straighten and crop: Use the crop tool to straighten the image if necessary, ensuring the horizon is level and vertical lines are straight. Crop out any unwanted or distracting elements to improve composition.
- Remove blemishes and distractions: Use the “Spot Healing Brush” or “Clone Stamp” tool to remove any blemishes, spots, or unwanted objects from the image. This could include dust, stains, reflections, or even removing items from the scene that are not desirable.
- Enhance colors: Use tools like “Saturation,” “Vibrance,” or “Color Balance” to boost or adjust the colors in the image. Make the sky bluer, grass greener, and other elements more vibrant. Be cautious not to overdo it, as the image should still look natural.
- Adjust perspective: If necessary, correct any perspective distortions using tools like “Transform,” “Perspective Crop,” or “Warp.” This helps to ensure that lines are straight and vertical structures appear upright.
- Enhance details: Use sharpening tools or filters like “Unsharp Mask” or “Smart Sharpen” to enhance the details and make the image appear crisper. This can be particularly useful for highlighting architectural features or textures.
- Add or enhance lighting: If desired, you can add or enhance lighting effects to make the image more inviting. This could involve creating natural-looking light sources or enhancing existing ones using techniques like dodging and burning.
- Resize and save: Finally, resize the image to the appropriate dimensions for its intended use (e.g., web or print). Save the edited image in the desired format, ensuring it maintains a high quality and suitable file size.
Remember, when editing real estate images, it’s essential to maintain the integrity of the property and avoid misrepresentation. Use Photoshop to enhance the image while keeping it true to reality.
FAQs About Real Estate Retouching
What is the typical turnaround time for real estate retouching services?
A skilled real estate retoucher understands the urgency in the real estate market. The turnaround time varies based on the scope of work but is generally within 24 to 48 hours.
Can real estate retouching fix poorly lit photos?
Yes, one of the specialties of a real estate retoucher is correcting lighting issues. Whether the photo is too dark or too bright, these professionals have the expertise to balance and enhance lighting effectively.
Are there ethical considerations in real estate retouching?
Ethics play a crucial role in real estate retouching. While enhancing features is acceptable, misrepresentation is not. A reputable real estate retoucher adheres to ethical standards, ensuring the edited images accurately represent the property.
Do real estate retouchers provide virtual staging services?
Absolutely. Virtual staging is a valuable service offered by many real estate retouchers. It allows potential buyers to envision a fully furnished and decorated space, enhancing the property’s marketability.
How can I find a reliable real estate retoucher?
Researching online reviews, checking portfolios, and seeking recommendations from real estate professionals are effective ways to find a reliable and skilled real estate retoucher.
Is real estate retouching only for residential properties?
No, real estate retouching extends to various property types, including commercial spaces and vacant land. The goal is to present each property in the best possible light, regardless of its use.
Conclusion:
In the competitive landscape of real estate, the role of a skilled real estate retoucher cannot be overstated. Their ability to transform images, enhance visual narratives, and collaborate seamlessly with photographers elevates property marketing to new heights. Embrace the power of professional real estate retouching to make your property listings stand out.