Photo editing for clothes images refers to the process of enhancing and modifying images that showcase clothing products. This can involve various edits and adjustments to improve the overall appearance, highlight the clothing items, and make them more appealing to potential customers.
Why editing clothing?
 Fashion photo edit can serve various purposes and can be done for both practical and aesthetic reasons. Here are some common reasons why people choose to edit or modify their clothing:
- Personal style: Editing clothing allows individuals to express their unique sense of style and fashion. People may alter clothing items to create a distinctive look that reflects their personality and preferences.
- Fit and comfort: Sometimes, off-the-rack clothing may not fit perfectly or provide the desired level of comfort. Editing clothing can involve tailoring or altering garments to ensure a better fit and enhance comfort.
- Repair and maintenance: Clothing items can get damaged or worn out over time. Editing clothing can involve repairing tears, replacing buttons, fixing zippers, or patching up holes to extend the lifespan of the garment.
- Upcycling and repurposing: Editing clothing can involve transforming old or unwanted garments into something new and stylish. This process, known as upcycling or repurposing, allows people to reduce waste and give new life to their clothing.
- Modesty or modest fashion: Some individuals may edit their clothing to adhere to specific cultural or religious norms regarding modesty. This can involve adding sleeves, lengthening hems, or layering garments.
- Creativity and customization: Editing clothing offers an opportunity for creative expression. People can customize their garments by adding embellishments, embroidery, dyeing, or painting to make them unique and personalized.
- Budget considerations: Instead of purchasing new clothing, editing existing garments can be a cost-effective way to update a wardrobe or keep up with current trends.
- Sustainable fashion: By editing clothing, individuals can contribute to sustainable fashion practices. Repurposing and upcycling garments help reduce textile waste and minimize the environmental impact associated with fast fashion.
Overall, editing clothing provides a means for individuals to exercise creativity, adapt clothing to their needs, and make conscious choices in line with their personal style and values.
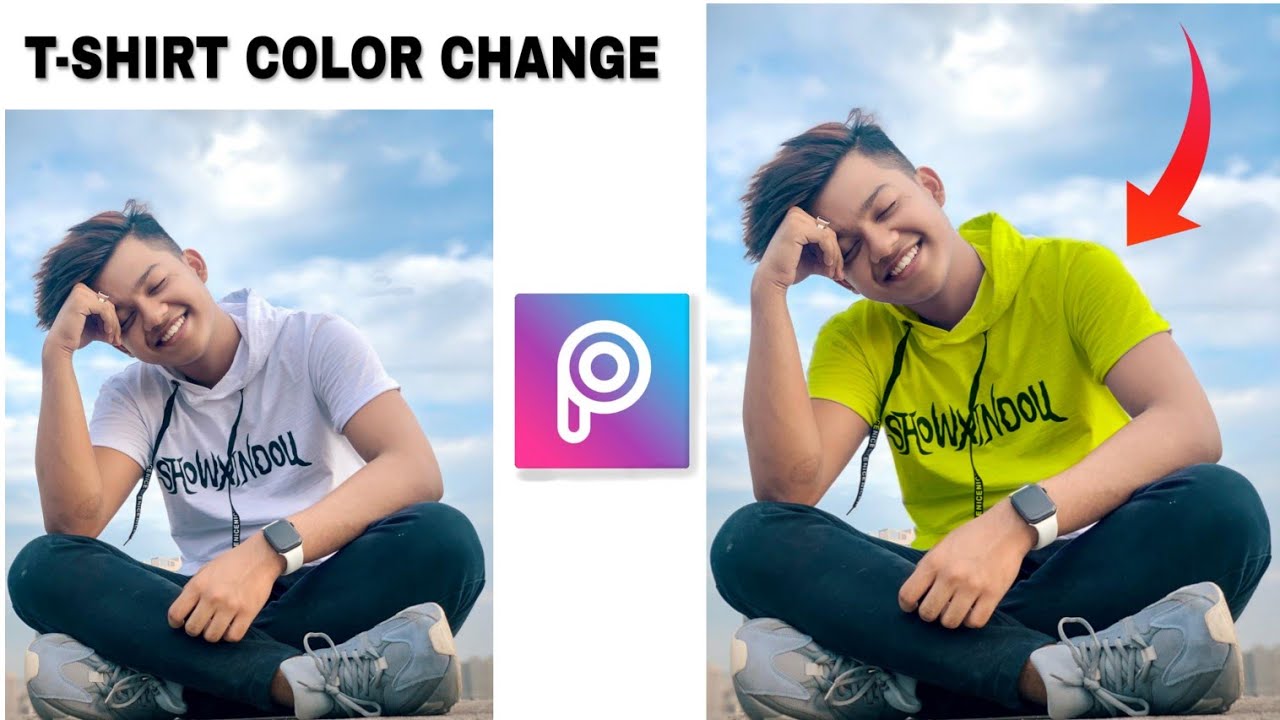 Photo editing clothing tool

There are several general photo editing software and applications available that can help you edit and enhance clothing in your photos.
Adobe Photoshop is one of the most popular and powerful photo editing tools available. With Photoshop, you can perform a wide range of edits, including adjusting colors, removing blemishes, altering shapes, and more. It offers advanced features like layers and masks, which can be used to isolate and modify specific areas of clothing.
Another popular option is Adobe Lightroom, which is more focused on organizing and enhancing photographs. Lightroom provides various adjustment tools to enhance colors, tones, and details, which can be useful for improving the appearance of clothing in your images.
If you’re looking for a simpler and more user-friendly option, there are numerous mobile apps available for both iOS and Android devices. Apps like Snapseed, VSCO, and Adobe Photoshop Express offer a range of editing tools and filters that can be used to enhance clothing in your photos directly from your smartphone.
While these tools may not be specifically designed for editing clothing, they provide a wide array of features and capabilities that can be applied to various aspects of photo editing, including clothing enhancement.
Photo editing process
The process of photo editing involves making adjustments and enhancements to a photograph using various software tools and techniques. Here is a general overview of the photo editing process:
- Importing: The first step is to import the photograph into a photo editing software such as Adobe Photoshop, Lightroom, or GIMP. This can be done by opening the software and selecting the “Import” or “Open” option.
- Basic adjustments: Once the photo is imported, you can start with basic adjustments like cropping, rotating, and straightening the image. This helps to improve the composition and alignment of the photo.
- Exposure and color adjustments: Next, you can work on adjusting the exposure, brightness, contrast, and levels of the image. This helps to correct any underexposed or overexposed areas and balance the overall tones. You can also adjust the color saturation, temperature, and white balance to achieve the desired look.
- Retouching: Retouching involves removing imperfections or unwanted elements from the photo. This can include blemishes, dust spots, scratches, or distracting objects. You can use tools like the healing brush, clone stamp, or spot healing brush to retouch these areas.
- Enhancements: At this stage, you can apply various enhancements to the photo. This may include sharpening the image, reducing noise, adjusting selective areas using masks or layers, or applying artistic filters or effects to create a specific mood or style.
- Resizing and formatting: Depending on the purpose of the photo, you may need to resize or format it for specific output requirements. For example, if you are preparing the photo for print, you might need to adjust the resolution and color profile accordingly. If the photo is for web use, you may need to optimize it for faster loading times.
- Saving and exporting: Once you are satisfied with the edits, you can save the final version of the photo. It is recommended to save a copy of the original photo before making any edits, so you can always go back to it if needed. You can choose different file formats like JPEG, TIFF, or PNG based on your requirements.
It’s important to note that the photo editing process can be much more intricate and extensive, depending on the complexity of the edits and the desired outcome. Different software tools provide a wide range of features and capabilities to enhance and manipulate photographs in various ways. Experimenting with different techniques and styles can help you develop your own editing workflow and achieve the desired results.
How editing clothes with photoshop?
Editing clothes with Photoshop involves using various tools and techniques to modify the appearance of clothing items. Here’s a general guide on how to edit clothes using Photoshop:
- Open the image: Start by opening the image of the clothing item you want to edit in Photoshop. Go to “File” and then “Open” to select the image file.
- Select the clothing: Use the appropriate selection tool (e.g., the Pen tool, Lasso tool, or Quick Selection tool) to select the clothing you want to edit. Make sure to refine the selection to include only the desired area.
- Isolate the clothing: Once you have made the selection, create a new layer by clicking on the “New Layer” button at the bottom of the Layers panel. This step is important to maintain the original image on a separate layer, allowing you to make non-destructive edits.
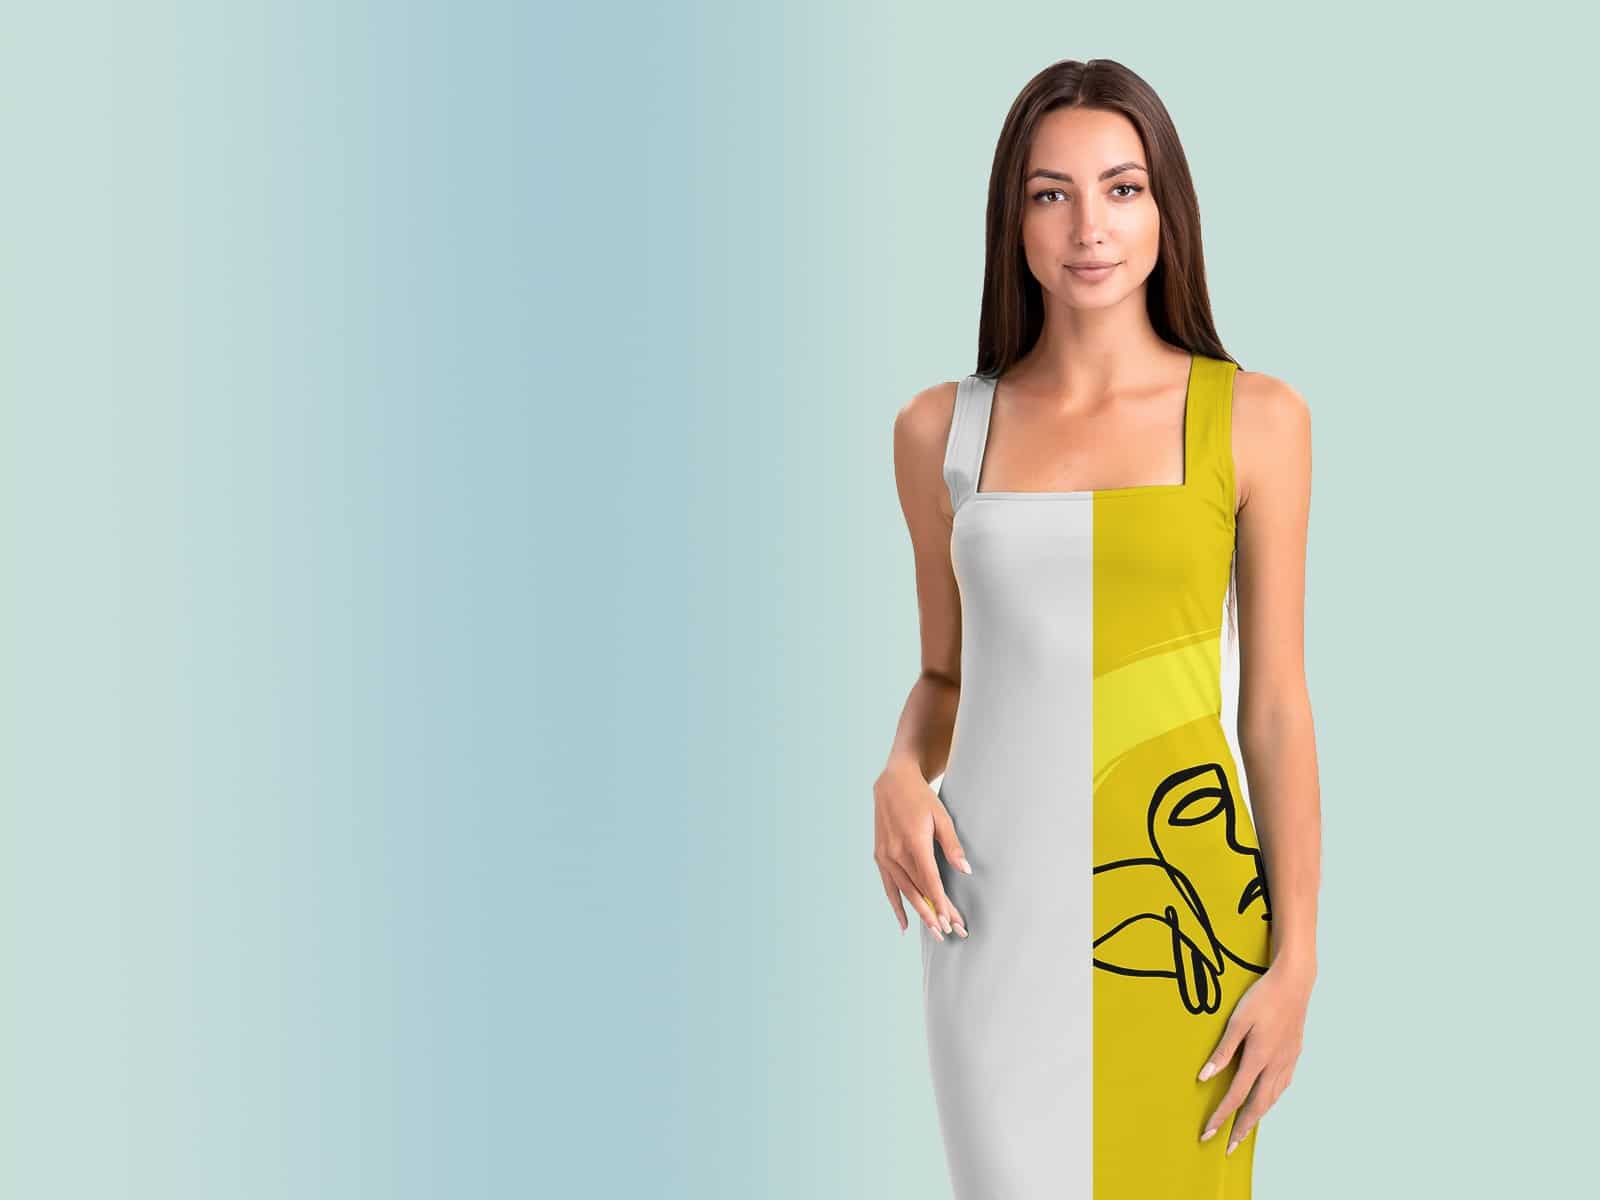
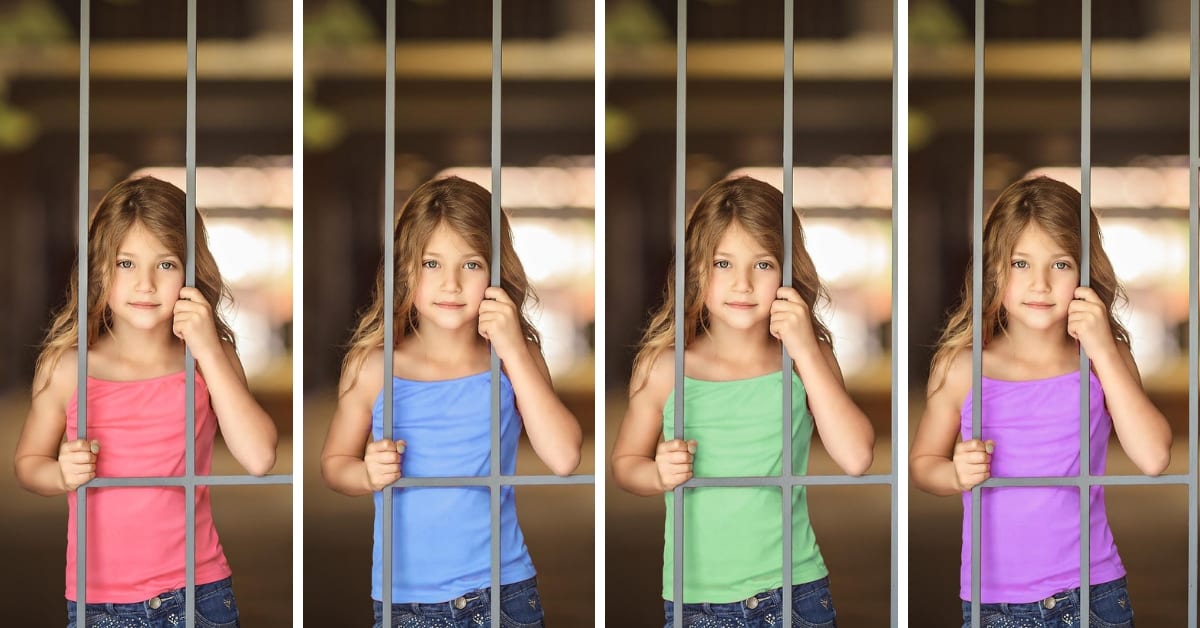
- Adjust colors: If you want to change the color of the clothing, go to “Image” and select “Adjustments.” From there, you can use options like “Hue/Saturation” or “Color Balance” to modify the colors. Make adjustments until you achieve the desired color.
- Remove wrinkles or blemishes: To eliminate wrinkles, blemishes, or other imperfections on the clothing, use the Healing Brush tool or the Clone Stamp tool. These tools allow you to sample a clean area of the clothing and paint over the problem areas, blending them seamlessly.
- Add or remove elements: If you want to add logos, patterns, or other elements to the clothing, you can use the Brush tool or the Pen tool to create and paint on a new layer. You can also use the Eraser tool to remove unwanted elements by carefully erasing them.
- Resize or reshape: If you need to resize or reshape the clothing, you can use the Transform tools. Select the layer containing the clothing, and then go to “Edit” and choose “Transform” to access options like scale, rotate, or distort. Use these options to adjust the clothing to the desired size or shape.
- Save the edited image: Once you are satisfied with the changes, save the edited image in a suitable file format (e.g., JPEG, PNG) by going to “File” and selecting “Save As.”
Remember to keep the original file untouched and work on a copy or use layers to maintain flexibility and preserve the original image if you need to make further adjustments. Experiment with different tools and techniques in Photoshop to achieve the desired results.
How editing clothes with lightroom?
Adobe Lightroom is primarily a photo editing software used for enhancing and manipulating digital images. It is not designed specifically for editing clothes, but you can use it to make adjustments to clothing in photographs. Here are some steps you can take to edit clothes using Lightroom:
- Import the photo: Launch Lightroom and import the photo you want to edit. Go to the Library module and click on the “Import” button to select and import the image into your catalog.
- Make basic adjustments: In the Develop module, start by making basic adjustments to the overall image, such as exposure, contrast, highlights, shadows, and white balance. These adjustments can help enhance the clothing and improve the overall look of the photo.
- Use the Adjustment Brush: Lightroom provides a powerful tool called the Adjustment Brush, which allows you to make selective adjustments to specific areas of the photo. You can use this tool to refine the clothing by adjusting parameters like exposure, contrast, saturation, and clarity.
- Remove blemishes or wrinkles: If there are any visible blemishes or wrinkles on the clothes, you can use the Spot Removal tool to remove them. Simply select the tool, adjust the size as needed, and click on the blemish or wrinkle to remove it. Lightroom will automatically clone or heal the area based on the surrounding pixels.
- Enhance colors: Lightroom provides various tools for color adjustments. You can use the HSL (Hue, Saturation, and Luminance) panel to fine-tune specific colors in the clothing. Adjusting the saturation and luminance can help make the colors pop or create a desired mood.
- Apply presets: Lightroom offers presets, which are pre-defined settings that can be applied to your photo with a single click. You can explore clothing-specific presets or create your own to achieve a desired look. Presets can help streamline your editing process and provide consistent results across multiple photos.
- Export the edited photo: Once you’re satisfied with the edits, you can export the photo in your desired format (JPEG, TIFF, etc.) and resolution. Lightroom offers options for resizing, sharpening, and adding watermarks during the export process.
Remember, Lightroom is primarily a tool for enhancing and manipulating images. If you require more advanced clothing editing, such as altering the design or pattern, you may need to use specialized software like Adobe Photoshop or other graphic design tools.
How editing clothes with luminar neo?
Luminar Neo is an advanced image editing software that primarily focuses on enhancing and manipulating photographs. While it offers numerous powerful features for adjusting and retouching images, it is not specifically designed for editing clothes. However, you can still make some modifications to clothing using Luminar Neo’s tools. Here are some general steps you can follow:
- Open your image in Luminar Neo by selecting “Open” or dragging the image into the software interface.
- Use the basic adjustment tools to fine-tune the overall image, such as adjusting brightness, contrast, saturation, and color temperature.
- If you need to make specific changes to the clothing, you can use the retouching tools provided by Luminar Neo. These tools include the Clone & Stamp tool, Healing Brush, and Erase tool, which can be used to remove imperfections, stains, or unwanted objects from the clothing.
- Luminar Neo also offers a variety of filters and effects that can be applied to the entire image or specific areas, including the clothing. You can experiment with these to achieve different styles or looks.
- If you want to change the color of the clothes, you can use the software’s selective adjustment tools, such as the Gradient Mask or Radial Mask, to isolate the clothing area and adjust the color using the color grading tools available.
- Once you’re satisfied with the changes, you can save the edited image in your desired format.
It’s worth noting that Luminar Neo might not offer the same level of precision and control as specialized photo editing software focused on fashion or clothing editing. If you require more advanced clothing editing features, you may need to consider using dedicated software like Adobe Photoshop or other applications specifically designed for fashion editing.
There are several mobile applications available that allow you to edit clothes or customize your wardrobe digitally. These apps provide various features to alter the appearance of garments, try different styles, colors, and patterns, and even create your own designs. Here are a few popular apps for editing clothes:
- Adobe Photoshop Express: This mobile version of the popular desktop software offers basic photo editing tools, including the ability to edit and retouch clothes. You can adjust colors, apply filters, remove stains, and make other alterations to your garments.
- PicsArt: Known for its versatile photo editing capabilities, PicsArt also includes features for clothing editing. You can remove backgrounds, add new patterns, colors, and textures to clothes, and even try virtual outfits on your photos.
- Fashmates: Fashmates is a social fashion platform that allows you to create outfits, mix and match clothes, and customize your wardrobe virtually. You can add and edit clothes from their extensive collection or upload your own items to style and personalize.
- Covet Fashion: While primarily a fashion game, Covet Fashion lets you experiment with clothing and accessory edits. You can dress up virtual models, mix and match different pieces, and apply various modifications to create unique looks.
- Style Studio: This app provides a virtual styling experience where you can edit and customize clothes. It offers options like resizing, recoloring, adding embellishments, and applying different patterns to garments.
Remember to explore each app’s features and user reviews to find the one that suits your needs and preferences best.
How to change color in photoshop
To change colors in Photoshop, you can follow these general steps:
- Open Photoshop and open the image you want to work on.
- Select the layer that contains the element you want to change the color of. If the image has multiple layers, make sure to select the appropriate one.
- Choose the selection tool that best suits your needs. The selection tools include the Marquee Tool (M), Lasso Tool (L), and Quick Selection Tool (W), among others. Use the appropriate tool to select the area you want to change the color of. You can refine the selection using selection tools and options like feathering.
- Once you have the area selected, go to the “Image” menu and choose “Adjustments.” From there, you have several options to modify the color. Here are a few common methods:
a. Hue/Saturation: This adjustment allows you to change the overall hue, saturation, and lightness of the selected area. A dialog box will appear with sliders that you can adjust to achieve the desired color changes.
b. Color Balance: This adjustment allows you to adjust the balance of colors in the selected area. You can make the image more cyan, magenta, yellow, or green, depending on your needs.
c. Replace Color: This adjustment allows you to select a specific color in the image and replace it with a new color. Click on the color you want to change in the preview window, and then adjust the “Fuzziness” slider to include similar colors in the selection. Finally, choose the new color using the “New Color” swatch.
d. Selective Color: This adjustment allows you to fine-tune specific color ranges in the selected area. You can adjust the cyan, magenta, yellow, black, or white values to achieve the desired color changes.
- After making the adjustments, you can further refine the changes by tweaking the sliders or options in the adjustment dialog box. Experiment with different settings until you achieve the desired color change.
- Once you’re satisfied with the color change, click “OK” to apply the adjustment. You can continue working on other areas of the image or save the file.
Remember to save your work as a Photoshop document (PSD) or create a copy before applying any changes to the original image to avoid permanent modifications.
These steps should help you get started with changing colors in Photoshop. However, note that the specific process may vary depending on the version of Photoshop you are using.