How edit product photos
 Editing product photos can be done using various photo editing software, such as Adobe Photoshop, Adobe Lightroom, or other image editing tools. Here is a step-by-step guide on how you can edit product photos:
- Import and select: Import the product photos from your camera or storage device into your preferred photo editing software. Once imported, review and select the photos you want to edit.
- Adjust exposure and white balance: Correct the exposure and white balance of the photos to ensure accurate color representation. You can use tools like brightness, contrast, levels, curves, and color balance to make adjustments as needed.
- Crop and straighten: Use the cropping tool to remove any unnecessary elements or distractions from the frame, and straighten the image if needed. This can help improve the composition and focus on the product.
- Retouching: Perform retouching to remove any imperfections or blemishes on the product, such as dust, scratches, or wrinkles. You can use tools like the clone stamp or healing brush to retouch the product and make it look more polished.
- Adjust sharpness and clarity: Enhance the sharpness and clarity of the product to make it look more detailed and crisp. You can use tools like the sharpening filter or clarity slider to achieve this.
- Color correction: Make any necessary color corrections to ensure accurate color representation of the product. You can use tools like the hue, saturation, and vibrance sliders to adjust the colors to your desired level.
- Background removal: If needed, you can use tools like the pen tool or the magic wand tool to remove the product from its background and place it on a transparent or different background.
- Resize and save: Finally, resize the edited product photo to the appropriate dimensions for its intended use, such as for online product listings or print materials. Save the edited photo in the desired file format, such as JPEG or PNG, with the appropriate quality settings.
Remember to always keep a backup of your original photos before making any edits, and experiment with different adjustments to achieve the desired look for your product photos.
How to edit product photo in photoshop
 Editing product photos in Photoshop can help enhance their appearance and make them more appealing to potential customers. Here are some general steps to edit product photos in Photoshop:
- Open the photo in Photoshop: Launch Photoshop and open the product photo you want to edit by going to File > Open and selecting the image file from your computer.
- Duplicate the layer: In the Layers panel, right-click on the background layer and select Duplicate Layer. This creates a duplicate layer, which allows you to make edits without modifying the original image.
- Adjust brightness and contrast: Go to Image > Adjustments > Brightness/Contrast. Use the sliders to adjust the brightness and contrast of the image until you achieve the desired look. This can help make the product stand out more and look more vibrant.
- Enhance colors: Go to Image > Adjustments > Vibrance. Use the sliders to adjust the vibrance and saturation of the image to make the colors pop. You can also use the Hue/Saturation or Color Balance adjustments to fine-tune the colors to your liking.
- Remove imperfections: Use the Spot Healing Brush or Clone Stamp tools to remove any unwanted spots, blemishes, or distractions from the image. You can also use the Healing Brush tool to smooth out any rough edges or imperfections on the product itself.
- Sharpen the image: Go to Filter > Sharpen > Smart Sharpen to apply sharpening to the image. Adjust the settings to achieve the desired level of sharpness without overdoing it.
- Add a background: If you want to change the background of the product photo, you can use the Magic Wand or Quick Selection tools to select the product, and then place it on a new background using the Layer > New > Layer via Copy command. You can then further refine the edges using the Layer Mask or Refine Edge tools.
- Save the edited image: Once you’re satisfied with the edits, go to File > Save As to save the edited image as a new file. Choose a file format that best suits your needs, such as JPEG for online use or TIFF for high-quality printing.
Remember to keep the original image intact and save your edited image as a separate file to avoid losing any information or making irreversible changes. Photoshop offers a wide range of tools and adjustments, so feel free to experiment and explore to achieve the desired result for your product photo.
How to edit product photos in lightroom
 Editing product photos in Lightroom can help enhance their appearance, make them more appealing, and give them a professional look. Here are some general steps to edit product photos in Lightroom:
- Import: Import your product photos into Lightroom by going to the Library module and clicking on the “Import” button. Select the photos you want to edit and click “Import.”
- Develop Module: Go to the Develop module in Lightroom, which is where you can make adjustments to your photos.
- Crop and Straighten: Use the Crop tool to adjust the composition of your product photo. You can also use the Straighten tool to straighten any crooked lines or horizons.
- Exposure and White Balance: Adjust the exposure, contrast, highlights, shadows, whites, and blacks to achieve the desired brightness and contrast for your product photo. Use the White Balance tool to correct any color casts.
- Clarity and Sharpening: Use the Clarity slider to enhance details and make your product photo look sharper. You can also apply sharpening to further enhance the sharpness of your product photo.
- Color Correction: Adjust the saturation, vibrance, and individual color channels to correct and enhance the colors in your product photo.
- Noise Reduction: Use the Noise Reduction tool to reduce any noise or graininess in your product photo, especially if you shot in low light conditions.
- Lens Corrections: Apply lens corrections to correct any distortions, vignetting, or chromatic aberrations that may have occurred during the photography process.
- Retouching: Use the Spot Removal tool to retouch any blemishes, dust, or unwanted elements in your product photo.
- Export: Once you’re satisfied with your edits, export your product photo to your desired file format (JPEG, TIFF, etc.) and resolution for web or print use.
Remember to save your edits as a new version of your photo, so you can always go back to the original if needed. Experiment with different adjustments and settings to achieve the desired look for your product photos.
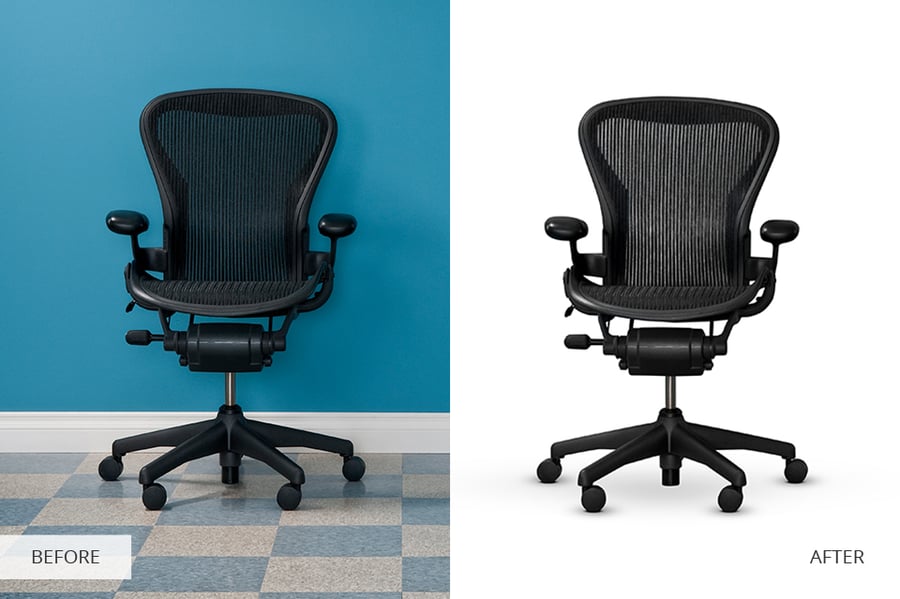
How to edit product photos white background
 There are several methods you can use to edit product photos and achieve a white background. Here are some commonly used techniques:
- Using a Background Removal Tool: You can use a background removal tool in photo editing software such as Adobe Photoshop, GIMP, or other online photo editing tools. These tools allow you to select and remove the background from your product photo, leaving only the product on a transparent or white background. You can then save the image with a white background.
- Adjusting Levels or Curves: You can use the Levels or Curves adjustment tool in photo editing software to adjust the brightness and contrast of your image. By increasing the brightness and reducing the contrast, you can make the background appear white while keeping the product properly exposed. You can selectively apply these adjustments using layer masks to avoid affecting the product itself.
- Using the Magic Wand or Selection Tools: You can use the Magic Wand or other selection tools in photo editing software to select the background around the product and then delete or replace it with a white color. You can refine the selection using feathering or refinement tools to ensure a smooth transition between the product and the white background.
- Cloning or Healing Brush: You can use the cloning or healing brush tool in photo editing software to clone or heal any areas of the background that may not have been properly removed, or to fix any imperfections or distractions on the white background. This can help you achieve a clean and professional-looking white background.
- Using a Lightbox or Light Tent: When capturing product photos, you can use a lightbox or light tent to create a clean and evenly lit background. This can reduce the amount of editing needed to achieve a white background and save you time in post-processing.
Remember to always work on a duplicate copy of your original photo, so you can always go back to the original if needed. Additionally, practice and experimentation with different techniques can help you refine your skills and achieve the desired result for your product photos.
How to edit product photos in canva
 Here’s a step-by-step guide on how to edit product photos in Canva:
Step 1: Log in to Canva Go to Canva’s website and log in to your account. If you don’t have an account, you can sign up for free.
Step 2: Create a new design Click on the “Create a design” button on the Canva dashboard. In the search bar, type “Product Photo” and select the appropriate template from the options that appear. Canva offers a variety of pre-designed templates specifically for product photos that you can choose from.
Step 3: Upload your photo Click on the “Uploads” tab on the left-hand side of the screen, then click on the “Upload an image or video” button. Select the product photo you want to edit from your computer and click “Open” to upload it to Canva.
Step 4: Edit your photo Once your photo is uploaded, you can start editing it in Canva. Here are some common editing tasks you can do:
- Crop: Click on your photo to select it, then click on the “Crop” button that appears above the photo. Drag the corner handles to adjust the cropping area, and click “Apply” when you’re done.
- Adjustments: Click on the “Adjust” button above the photo to access various adjustment tools, such as brightness, contrast, saturation, and more. Use these tools to fine-tune the look of your photo.
- Filters: Canva offers a variety of filters that you can apply to your photo to give it a different look. Click on the “Filter” button above the photo to access the filter options, and click on a filter to apply it to your photo.
- Text: If you want to add text to your product photo, click on the “Text” tab on the left-hand side of the screen. Choose a text template or click “Add a heading” or “Add a subheading” to create your own text. You can customize the font, size, color, and alignment of the text using the options that appear above the text box.
- Elements: Canva also offers a wide range of elements, such as shapes, stickers, icons, and illustrations, that you can add to your product photo to enhance its visual appeal. Click on the “Elements” tab on the left-hand side of the screen to access the element options, and drag and drop them onto your photo to add them.
Step 5: Save and download your edited photo Once you’re satisfied with your edits, click on the “Download” button in the top right corner of the screen to save your edited product photo. Choose the file format and size you want for your photo, then click “Download” to save it to your computer.
That’s it! You’ve successfully edited your product photo in Canva. You can now use it for your online store, social media, or any other marketing materials as needed.
How to edit product photos on iphone
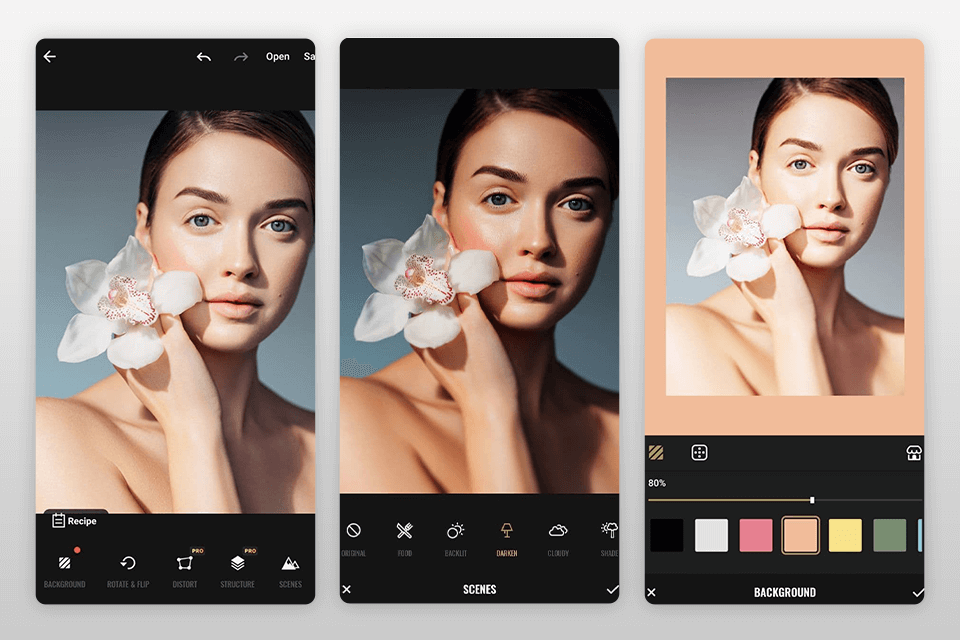 Editing product photos on an iPhone is easy with the help of various photo editing apps available on the App Store. Here are the steps to edit product photos on an iPhone:
Step 1: Choose a Photo Editing App There are numerous photo editing apps available on the App Store, such as Adobe Lightroom, VSCO, Snapseed, and many others. Choose the one that suits your editing needs and download it from the App Store.
Step 2: Open the App and Select a Photo Launch the photo editing app on your iPhone and select the product photo that you want to edit from your camera roll or photo library.
Step 3: Apply Basic Edits Most photo editing apps offer basic editing tools such as cropping, straightening, adjusting brightness, contrast, exposure, and saturation. Use these tools to make adjustments to your product photo as desired. You can also use the auto-enhance or auto-adjust feature to automatically enhance the overall look of the photo.
Step 4: Fine-Tune with Advanced Editing Tools If you want to further refine your product photo, you can use advanced editing tools such as selective adjustments, curves, levels, and color adjustments. These tools allow you to make more precise adjustments to specific areas of your photo, giving you more control over the final result.
Step 5: Add Filters or Presets Many photo editing apps come with built-in filters or presets that you can apply to your product photo to give it a specific look or mood. Experiment with different filters or presets to find the one that best complements your product photo.
Step 6: Save and Share Once you are satisfied with the edits, save your edited product photo to your camera roll or photo library. You can also share it directly to social media platforms or other photo sharing platforms from within the photo editing app.
Step 7: Keep a Backup It’s always a good practice to keep a backup of your original, unedited product photo, in case you need to make further adjustments or revert to the original image in the future.
That’s it! By following these steps, you can easily edit your product photos on your iPhone using a photo editing app to enhance their quality and make them more visually appealing.
Frequently Asked Questions (FAQs)
How can I ensure a natural look in my edited product photos?
Achieving a natural look involves a careful balance of color correction, lighting adjustments, and avoiding over-editing. Focus on enhancing rather than altering to maintain authenticity.
What is the ideal image resolution for product photos?
For online use, a resolution of 72 pixels per inch (ppi) is generally sufficient. However, for print, aim for a higher resolution, ideally 300 ppi, to ensure sharp and detailed images.
Are there any free editing tools suitable for product photos?
Yes, several free tools like GIMP, Pixlr, and Snapseed offer robust editing capabilities suitable for enhancing product photos without breaking the bank.
How can I create a professional-looking background for my product photos?
Achieve a professional background by using a neutral backdrop or opting for background removal tools during the editing process. Ensure the focus remains on your product.
What role does photo editing play in e-commerce success?
Photo editing is pivotal in e-commerce, as visually appealing product images enhance customer trust, increase conversion rates, and contribute to a positive online shopping experience.
Is it necessary to hire a professional photographer for product photos?
While hiring a professional photographer can yield high-quality results, with the right tools and knowledge, individuals can achieve impressive product photos through self-editing.
Conclusion: Elevate Your Product Photography Game!
Armed with the knowledge shared in this guide, you’re now equipped to edit product photos with finesse. Transform your visuals, captivate your audience, and set your brand apart in the competitive world of online content. Embrace the creative journey and watch your product images come to life!